
https://emalliab.wordpress.com/2023/03/12/unbricking-a-seeed-xiao-samd21/
https://emalliab.wordpress.com/2023/03/12/unbricking-a-seeed-xiao-samd21/
There are two different libraries for the ESP32 (included in the Arduino core for the ESP32): the SD library and the SDD_MMC.h library.
If you use the SD library, you’re using the SPI controller. If you use the SDD_MMC library you’re using the ESP32 SD/SDIO/MMC controller. You can learn more about the ESP32 SD/SDIO/MMC driver.

Soure: https://github.com/arduino/ArduinoCore-avr/blob/master/cores/arduino/main.cpp
| #include <Arduino.h> |
| // Declared weak in Arduino.h to allow user redefinitions. |
| int atexit(void (* /*func*/ )()) { return 0; } |
| // Weak empty variant initialization function. |
| // May be redefined by variant files. |
| void initVariant() __attribute__((weak)); |
| void initVariant() { } |
| void setupUSB() __attribute__((weak)); |
| void setupUSB() { } |
| int main(void) |
| { |
| init(); |
| initVariant(); |
| #if defined(USBCON) |
| USBDevice.attach(); |
| #endif |
| setup(); |
| for (;;) { |
| loop(); |
| if (serialEventRun) serialEventRun(); |
| } |
| return 0; |
Source: https://roboticsbackend.com/arduino-variable-types-complete-guide/#char
What are the different Arduino variable types?
Whether you are a complete Arduino beginner or you already know how to program, this guide will help you discover and all the most useful Arduino variable types.
First of all, Arduino is a subset of C/C++, with additional functionalities related to the hardware features of the board. So, you might expect to have similar data types. This is true for some types, but with Arduino you also get modified and new exclusive types.
Let’s discover all the Arduino variable types you will use, with the limits and particularities for each of them.
Table of Contents
The byte number is the smallest Arduino data type you can use for round numbers when programming with Arduino. A byte contains 8 bits.
A bit is simply a binary piece of information: 0 or 1.
You are learning how to use Arduino to build your own projects?
Check out Arduino For Beginners and learn step by step.
So, a byte will contain 8 binary values. For example, the number 45 written in 8-bit will look like this: 00101101. This is how the byte will be stored in the Arduino. In your program you can choose to either use the binary representation of the number, or the decimal representation (hexadecimal also works).
And you can print a number with the Serial.println() function, using different arguments for different representations of the number.
Here the result in the Serial Monitor will be:
The min value for a byte is 0, and the max value is 255 (byte is an unsigned data type, more on that later in this tutorial).
As you can see that’s quite short, so pay attention when you use this data type. Only use it to store very small numbers.
And what happens if you try to store a number lower than 0, or bigger than 255? Well the program will still work, but your variable will overflow. Overflow means that once the value reaches 256, it will go back to 0.
So, if you try to assign 260 to a byte:
You will get:
260 has become 4, because 256 goes back to 0, then 257 becomes 1, etc… and 260 becomes 4.
So, again, pay attention when using small data types such as byte in your Arduino programs: if you try to use a too big number, the variable will overflow and its value won’t be correct. Your program will still compile, but when running you’ll get all kinds of application errors.
Int, or integer, is one of the most common variable types you will use and encounter.
An int is a round number which can be positive or negative.
On Arduino boards such as Uno, Nano, and Mega, an int stores 2 bytes of information. So, for example, 9999 will be represented by 00100111 00001111. Although you don’t need to know the binary representation, you can just work with decimal numbers.
You can use int everywhere, to store any information represented by a round number. For example: a counter, temperature, number of steps for a stepper motor, angle for a servomotor, etc.
The min value for a 2-bytes int is -32 768 and the max value is +32 767. As for bytes, it can overflow.
For example, if you try to assign 32 768 (which is just above the max limit), the value you will read inside the variable will be -32 768.
And if you try to assign -32 769, you will get +32 767.
Thus, pay attention not to use too big numbers with int. On boards such as Arduino Due and Zero, integers store 4 bytes, so the value range is much higher: -2,147,483,648 to 2,147,483,647.
But on classic Arduino boards (Uno, Nano, Mega, etc.), if you want to use bigger integer numbers you’ll have to use long instead of int.
A long is exactly the same as an int, but using 4 bytes. The minimum value becomes -2,147,483,648 and the max value 2,147,483,647. With this you don’t need to worry too much about overflowing.
Usually, you’ll use long when you know (or suppose) the size of an int won’t be enough.
For the standard round number variables, you can add “unsigned” before the data type to modify it a little bit.
If you add “unsigned”, the variable will contain only positive numbers, starting from 0.
This is what we had for byte, which is already an unsigned data type (in fact, similar to unsigned char, which you’ll see later).
To create an unsigned int:
An unsigned int will start at 0 and have a max value of 65 535 (4,294,967,295 in 4 bytes board such as Due/Zero). As you don’t have negative numbers anymore, all those numbers are added to the max positive value you can use.
The concept of overflow here is the same. If you try to use 65 536 you’ll go back to 0.
So, unsigned int can be used if you’re sure that you’ll only store positive numbers (it will enforce it) for the variable. Also, the max limit increases, so for example if you have to use a variable that goes from 0 until 50 000 for reading a sensor, this will be a good option.
To create an unsigned long:
An unsigned long will start at 0 and have a max value of 4,294,967,295, which is a very big number.
Again, the use you’ll make of long is pretty similar to int data type, just for larger numbers.
On Arduino, when you try to get the time with millis or micros, you will get a result in unsigned long.
The bool/boolean is a particular Arduino data type which only contains a binary information: 1 or 0 (true or false).
You will use booleans to test conditions where the answer is a simple yes/no.
In Arduino you can use the standard C++ bool type, or the boolean type which is identical. However, the Arduino documentation suggests that you only use bool.
For now we’ve only seen how to store and use round numbers with Arduino. But what if you want to store a number such as 3.14 ?
A float variable can store a negative or positive float number. As for every data type it has a minimum and a maximum: 3.4028235E+38 to -3.4028235E+38. This is much bigger than long, even though a float is also stored on 4 bytes. The reason is simply because both data types are stored in a different manner.
To create a float:
So, the resolution of a float is greater than round numbers, which make them convenient for some computations or to read a continuous value from a sensor.
Note however that the precision for float is not 100%, contrary to round number data types.
For example, if you try to assign 3.00 inside a float number, the real value might be something like 3.0000001.
In boards such as Uno, Mega and Nano, double and float are identical.
On Due for example, the double is stored on 8 bytes instead of 4, which makes it different. You can store even bigger numbers.
One thing to know about float numbers (float or double data type): the Arduino micro-controller will take much more time to process a computation with float numbers than with round numbers. As the computation power is very limited, try to use round numbers as much as you can, and float numbers only when you don’t have the choice.
Great, now you have seen how to store booleans, round and float numbers. The last important category here is how to store text, which is often used when you want to share information with the user (text makes more sense to a human than a hexadecimal code) or to communicate in ASCII for example.
The char data type is quite particular because it’s mainly used to store letters, but in the end the real value is a number between -128 and +127 (stored in 1 byte). The corresponding values between letter and numbers are the ones you can find in the ASCII table.
For example, the letter ‘F’ uppercase has the value 70, and ‘f’ lowercase has the value 102.
You can make computations using char. If you add +1 to the letter ‘F’, the number will become 71, and the corresponding letter ‘G’ uppercase.
The char data type can be quite useful to send data over Serial/I2C/SPI between devices. It doesn’t take much space (1 byte which is the minimum), so it’s faster to transfer, and you can directly associate an action to a letter – ex: ‘m’ to move the motor, ‘s’ to stop, ‘a’ to accelerate, etc.
The unsigned char data type is in fact the exact same as the byte variable type. Both have a minimum value of 0 and a max of 255.
It is recommended that you use byte instead of unsigned char.
The String data type is specific to Arduino, you can’t find it in standard C/C++. Also, note the uppercase “S”. The variable type is String, not string.
You will use this type to store text. You can perform operations such as concatenation directly with the “+” operator.
String is a class, it’s not a primitive data type. To create a string, you’d have to use an array of chars. With the String class, you get to simplify your life and you also have a bunch of extra functionalities.
And of course, each of the Arduino data types you’ve seen here can be stored inside an array.
Make sure to only use one single data type for all elements of an array.
In this tutorial you have discovered all the standard Arduino data types you’ll most frequently use in your programs.
Don’t hesitate to come back to this guide whenever you’re not sure about which variable type you should use, or what are their limitations.
A few general pieces of advice to finish:
Now, don’t forget that premature optimization is the root of all evil. When you write your programs, use larger data type if any hesitation, and only optimize when you see that things are too slow.
Let’s use a real life analogy. Imagine you’re waiting for an important email. You don’t know when it will arrive, but you want to make sure you read it as soon as it arrives in your mailbox.
The most basic solution is to frequently check your mailbox – let’s say, every 5 minutes – so you’re sure the maximum delay between the reception of the email, and you reading it, is 5 minutes. But this is really not an ideal solution. First, you’ll spend all your time refreshing your mailbox and won’t do any productive thing in the meantime. And second, this is relatively inefficient. When the email arrives, you’ll have up to 5 minutes delay before you read it.
This technique is called “polling“. At a given frequency, you’re polling the state of something to see if a new information arrived. At a human scale you see that it’s completely not worth it.
The other possible way to do that is to use interrupts. For us humans, this means turning on notifications. As soon as the email has arrived, you will get a popup on your phone/computer saying that the email is here. You can now check your email, and the delay between the reception and you reading the email is basically zero.
Let’s add more details to this analogy: the email you’re about to receive contains a special offer to get a discount on a given website – and this offer is available only for 2 minutes. If you use the “polling” technique, there is a chance that you miss some data (in this example, you’ll miss the discount). With interrupts, you can be sure you won’t miss it.
Another example: you’re waiting to talk to the postman about something. You now he will arrive between 9am and 11am. First option – polling – you can keep going to your door to check if he has arrived. But maybe you’ll miss him, because you can’t always be at your window looking at the street.
Second option – interrupts – you put a note on your door saying “Dear Mr. Postman, please ring the bell when you see this”. As soon as the postman arrives, he will ring the bell and you won’t miss him.
In both scenarios, you stop your current action. That’s why it’s called an interruption. You have to stop what you’re doing to handle the interruption, and only after you’re done with it, you can resume your action.
Arduino Interrupts work in a similar way.
For example, if you are waiting for a user to press on a push button, you can either monitor the button at a high frequency, or use interrupts. With interrupts, you’re sure that you won’t miss the trigger.
The monitoring for Arduino Interrupts is done by hardware, not software. As soon as the push button is pressed, the hardware signal on the pin triggers a function inside the Arduino code. This stops the mains execution of your program. After the triggered function is done, the main execution resumes.
Note that for the real life analogies above, interrupts make much more sense than the polling technique. However I want to point that sometimes, polling can be a better choice. At human scale, interrupts make much more sense. At a micro-controller scale, where the frequency of execution is much higher, sometimes it becomes complicated than that and the choice is not always obvious. We’ll discuss more about it later in this post.
Arduino Interrupts Pins are using digital pins. However, usually you can’t use all available digital pins. Only some of them have the functionality enabled.
Here are the pins you can use for interrupts on the main Arduino boards:
| Arduino Board | Digital Pins for Interrupts |
|---|---|
| Arduino Uno, Nano, Mini | 2, 3 |
| Arduino Mega | 2, 3, 18, 19, 20, 21 |
| Arduino Micro, Leonardo | 0, 1, 2, 3, 7 |
| Arduino Zero | All digital pins except 4 |
| Arduino Due | All digital pins |
On this tutorial we’ll be using an Arduino Uno board, so we only have two choices! We can either use pin 2 or pin 3.
If you want to use more interrupts in your programs, you can switch to the Arduino Mega. This board is really pretty close from the Arduino Uno, with more pins. And if you need even more interrupts, choose something like the Arduino Due – pay attention though, the Due works with 3.3V, not 5V.
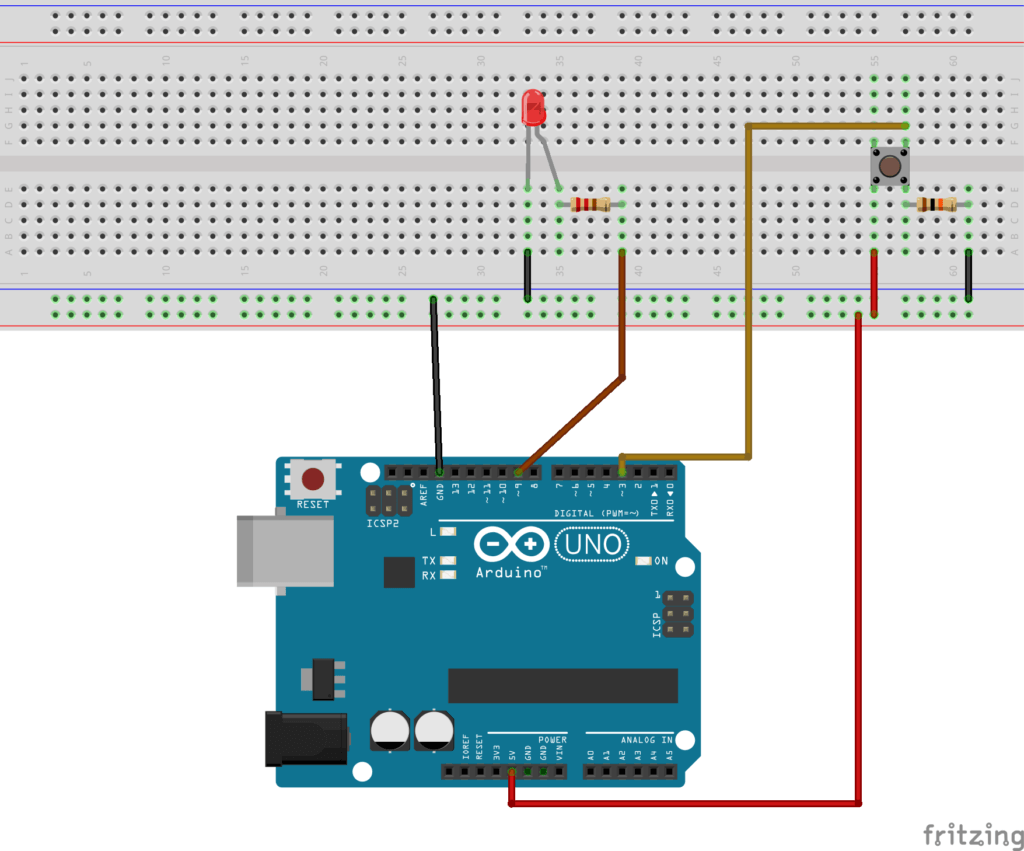
Note that we are using the pin 3 for the button. As previously stated,
on Arduino Uno you can only use pin 2 and 3 for interrupts. Pay
attention when you have to choose a pin for an interrupt. If the pin is
not compatible with interrupts your program won’t work (but still
compile), and you’ll spend quite some time scratching your head while
trying to find a solution.
Arduino interrupts are triggered when there is a change in the digital signal you want to monitor. But you can choose exactly what you want to monitor. For that you’ll have to modify the 3rd parameter of the attachInterrupt() function:
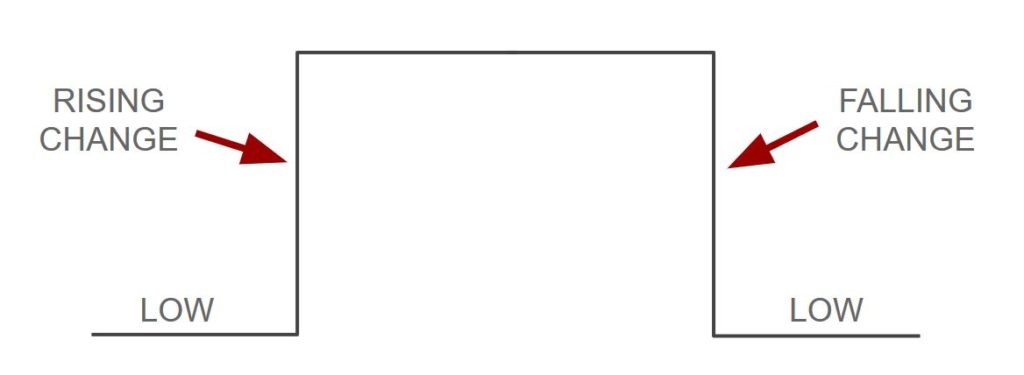
Practically speaking, you could monitor when the user presses the buttons, or when he/she releases the button, or both.
If you’ve added a pull-down resistor to the button – meaning its normal state is LOW – then monitoring when it’s pressed means you have to use RISING. If you’ve added a pull-up resistor, the button state is already HIGH, and you have to use FALLING to monitor when it’s pressed (linked to the ground).
Nothing really new here. We initialize the pin of the LED as OUTPUT and the pin of the button as INPUT. In the loop() we monitor the button state and modify the LED state accordingly. Note that for simplicity I haven’t use a debounce on the button.
Here we changed the way we are monitoring the push button. Instead of polling its state, there is now an interrupt function attached to the pin. When the signal on the button pin is rising – which means it’s going from LOW to HIGH, the current program execution – loop() function – will be stopped and the blinkLed() function will be called. Once blinkLed() has finished, the loop() can continue.
Here, the main advantage you get is that there is no more polling for the button in the loop() function. As soon as the button is pressed, blinkLed() will be called, and you don’t need to worry about it in the loop().
As you might have noticed, we use the keyword “volatile” in front of the ledState variable. I’ll explain you later in this post why we need that.
You have to use the attachInterrupt() function to attach a function to an interrupt pin. This function takes 3 parameters: the interrupt pin, the function to call, and the type of interrupt.
As you can guess, you should make the interrupt function as fast as possible, because it stops the main execution of your program. You can’t do heavy computation. Also, only one interrupt can be handled at a time.
What I recommend you to do is to only change state variables inside interrupt functions. In the main loop(), you check for those state variables and do any required computation or action.
Let’s say you want to move a motor, and this action is triggered by an interrupt. In this case, you could have a variable named “shouldMoveMotor” that you set to “true” in the interrupt function.
In your main program, you check for the state of the “shouldMoveMotor”. When it’s true, you start moving the motor.
And you can do exactly the same for a heavy computation, for example if the computation takes more than a few microseconds to complete.
If you don’t keep the interrupts fast, you might miss important deadlines in your code. For a mobile robot with 2 wheels, that may make the motor movement jerky. For communication between devices, you might miss some data, etc.
When you need to deal with real-time constraints, this rule becomes even more important.
A basic rule of thumb: don’t use time functionalities in your interrupts. Here’s more details about the 4 main time functions:
All in all, you should avoid using those functions.
Maybe using millis() or micros() can sometimes be useful, if you want to make a comparison of duration (for example to debounce a button). But you can also do that in your code, using the interrupt only to notify of a change in the state of the monitored signal.
The Serial library is very useful to debug and communicate between your Arduino board and another board or device. But it’s not a great fit for interrupt functions.
When you are inside an interrupt, the received Serial data may be lost. Thus it’s not a good idea to use the reading functionalities of Serial. Also if you make the interrupt too long, and read from Serial after that in your main code, you may still have lost some parts of the data.
You can use Serial.print() inside an interrupt for debugging, for example if you’re not sure when the interrupt is triggered. But it also has its own source of problems.
The best way to print something from an interrupt, is simply to set a flag inside the interrupt, and poll this flag inside the main loop() program. When the flag is turned on, you print something, and turn off the flag. Doing that will save you from potential headaches.
If you modify a variable inside an interrupt, then you should declare this variable as volatile.
The compiler does many things to optimize the code and the speed of the program. This is a good thing, but here we need to tell it to “slow down” on optimization.
For example, if the compiler sees a variable declaration, but the variable is not used anywhere in the code (except from interrupts), it may remove that variable. With a volatile variable you’re sure that it won’t happen, the variable will be stored anyway.
Also, when you use volatile it tells the controller to reload the variable whenever it’s referenced. Sometimes the compiler will use copies of variables to go faster. Here you want to make sure that every time you access/modify the variable, either in the main program or inside an interrupt, you get the real variable and not a copy.
Note that only variables that are used inside and outside an interrupt should be declared as volatile. You don’t want to unnecessarily slow down your code.
An interrupt function can’t take any parameter, and it doesn’t return any value. Basically if you had to write a prototype for an interrupt this would be something like
Thus, the only way to share data with the main program is through global volatile variables. In an interrupt you can also get and set data from hardware pins, as long as you keep the program short. For example, using digitalRead() or digitalWrite() may be OK if you don’t abuse it.
Arduino interrupts are very useful when you want to make sure you don’t miss any change in a signal you monitor (on a digital pin mostly).
However, during this post you saw that there are many rules and limitations when using interrupts. This is something you should handle with care, and not use too much. Sometimes, using simple polling may be more appropriate, if for example you manage to write an efficient and deterministic multitasking Arduino program.
Interrupts can also be used just to trigger a flag, and you keep using the polling technique inside your main loop() – but this time, instead of monitoring the hardware pin, you monitor the software flag.
The main takeaway for you, if you want to use interrupts in your code: keep your interrupts short. Thus you will avoid many unnecessary and hard-to-debug problems.
Source: https://roboticsbackend.com/arduino-interrupts/#Types_of_interrupts
http://arduino.vn/bai-viet/411-timercounter-tren-avrarduino
http://www.hocavr.com/2018/06/c-cho-avr.html
https://www.digikey.com/en/maker/blogs/2022/how-to-avoid-using-the-delay-function-in-arduino-sketches
https://www.hobbytronics.co.uk/arduino-timer-interrupts
